Wednesday, July 27, 2011

My Creative Time's Guest Designer!

Emma, over at My Creative Time  asked me to be a Guest Designer for her today! I am ecstatic that my projects were enough to catch her eye. She always has the cutest cards and projects on her website and her designers...well they are just as fabulous! You'll just have to head on over there instead of taking my word for it!

I'm sure most of you know, that she just released her 8th stamp set last Friday too! You can view the new sets HERE! They are fabulous and once again ones that I absolutely could not live without! :) I hope you all enjoy my project showcasing the fabulous MY Creative Time stamp set, "Wow, So Many Candles!" and the new Cricut Cartridge "Sweet Tooth Boxes!"

Thank you once again Emma for allowing me this opportunity! :)


For this project I used the K&CO Confetti Paper Stack for all my cardstock and cuts. It has a ton of great designs in it! I chose Box 3 from the Sweet Tooth Box cartridge, and the scalloped lid. I cut the box at 10 1/2 inches and took the lid down to about 10.3 inches. I felt leaving it at the 10 1/2 was a little too big. I used my Gypsy to cut a star in the middle of the front panel of the box. The star was from George and Basic Shapes cut at 2 inches. I used a small piece of cellophane and adhered it to the inside. I used my Gypsy to create an outline of the star to cut out, so it has a border. That was cut just a few clicks larger than 2 inches. Cricut American Alphabet was used to cut out the cupcake (1 3/4 inches) and party hat (2 1/4 inches) on both sides of the box and the present ( 2 1/2 inches) on the back. I used some Tim Holtz Vintage Photo Distress Ink on all the edges. My stamped sentiments came from the "Wow, So Many Candles" stamp set, and I of course had to use that new die and stamp from "Inspiring Words" for the little tag. I finished the top off with some Offray Aqua Ribbon.

To complete the gift, I made a 4x4 card with some of the scraps from the cuts. I used a PaperTrey Ink RickRack Border Die for the border on on the card. The star was the one cut from the box. I again chose a sentiment from "Wow, So Many Candles!"

I hope you all have enjoyed checking out my Guest Designer Project!

Tuesday, July 26, 2011

Some new toys to play with!

It was almost like Christmas today here! First, I got these fabulous My Creative Time Stamps, you can check them out over at www.creativetimeformeshoppe.blogspot.com! This is the newest (8th) release and a couple ones from prior releases, that I didn't realize I needed until the other day! Oh and check out those new dies! I LOVE them!


I also ordered some Distress Stain and some Adirondack Paint Dabbers. I saw some videos on using these and figured I needed to try them out! I also got that Distrezz-it-all finally. I've been eyeing it for a while...just never picked it up! The Pearl pens I got a while back, I'm not even sure where!


I picked up these Tim Holtz goodies at Hobby Lobby the last time I was in UT. Gosh...it's been a couple weeks now! I hate not having a craft store here...but my wallet seems to be okay with it! Can't wait to use these on some projects!

Saturday, July 16, 2011

Cricut Circle Monthly Challenge!

I've been in the "circle" for awhile now, but haven't entered any of the challenges. I saw this month's challenge and thought I'd give it a go. You can read all about the challenge at The Cricut Circle Blog if you are a member. The theme this month is BBQ, Picnic or a Patio theme. I chose the BBQ, because that is one of my FAVORITE things about summer. Nothing like a good ole' BBQ with the family! Here is my project!


Recipe for my BBQ invite:

PaperTrey Ink Kraft cardstock (7 1/2 x 5")
ColorBok cardstock used to print patterned paper from the Imagine
Misc black and gray cardstock from my scrap paper
Winter Frolic Cricut Cartridge
     Tag Insert cut at 5 1/2"
Kate's Kitchen Imagine Cartridge
     Today's Menu cut at 2 3/4"
Block Party Cricut Cartridge
     Grill cut at 4 3/4"
     BBQ phrase cut at 1 3/4" filled with solid and pattern from Kate's Kitchen
Tim Holtz Distress Brushed Pewter Stickles
iRock black Gems
Terrifically Tacky Tape
Scrapbook Adhesive Pop Dots
Tim Holtz Distress Vintage Photo Ink
StazOn Ink
Pink By Design "Party Time" Stamp Set
PaperTrey Ink Vintage Cream Ribbon

Enjoy!!

Throwback Thursday Challenge!!

Emma over at My Creative Time is hosting another Throwback Thursday challenge! For this challenge, you need to use either the Wild Card Cricut cartridge or Just Because Cards cartridge. You also needed to incorporate some embossing (dry or heat) on your project. Emma is also releasing some MORE new stamps next week! Can't wait!


Just Because Cricut cartridge (page 35)

I used the top layer of this card and welded it together on my Gypsy to create the card base. (I got the idea from Nikki because I just loved the shape of the card!)

Vintage Papers Imagine Patterned cartridge
PaperTrey Ink Kraft cardstock
ColorBok white cardstock (printed with the Imagine)
PaperTrey Ink Twine
PaperTrey Ink Berry Sorbet Ribbon
PaperTrey Ink Vintage Buttons
Imaginisce Bitty Blossom Flowers
iRock Jewels
Tim Holtz Vintage Photo Distress Ink
My Creative Time Die
My Creative Time "Inspiring Words" and "Inspiring Words - Accents" Stamp Sets
American Kraft Grapefruit Embossing Powder
Versa Mark Embossing Pad

Enjoy!!

My Pink Stamper Design Team Challenge!!

Robyn over at My Pink Stamper is having another Design Team call! You can read all about it on her blog. For this challenge we were required to use the colors orange, turquoise, green and brown. Here is my submission!


Recipe for my Roar! card:

5 1/2" x 5 1/2" card
Create a Critter Cricut cartridge
     Dinosaur (page 50) and layers cut at 4"
Stampin' Up Cardstock: Pumpkin Pie, Tempting Turquoise, Certainly Celery, Wild Wasabi
Brown cardstock from my stash
Scenic Route Metropolis patterned paper
My Pink Stamper "Boy Crazy" Stamp Set
My Pink Stamper "Birthday Crazy" Stamp Set
PaperTrey Ink Twine
Martha Stewart Punch
Stampin' Up Early Espresso Ink
Tim Holtz Vintage Photo Distress Ink

Enjoy!! And to everyone who is submitting a project...GOOD LUCK!

Thursday, July 14, 2011

Turtley Awesome

I watched a video over on My Pink Stamper the other day and Robyn was creating a super simple card as part of her quick summer series. Sometimes I need to think about creating more of these simple little cards, instead of cards that seem to take me forever to complete! So I decided to use the same colors and my new Creative Memories Cricut Traveler cartridge to create this "Turtley Awesome" card! Thanks Robyn for another fantastic idea!


Creative Memories Cricut Traveler Cartridge
     Turtle cut at 3 1/2"
ColorBok White cardstock printed with colors from the Vintage Damask Imagine cart
PaperTrey Ink Brown cardstock
My Pink Stamper "Even More Punnylicious" stamp set
Stampin' Up Chocolate Chip Ink
Cuttlebug Spots and Dots Embossing Folder
Glossy Accents
Icicle Stickles
Martha Stewart Punch

Enjoy!!

Tuesday, July 12, 2011

Aloha!

Okay...I'm not in Hawaii or anything, (that was our family vacation last year), but this stamp seemed to fit so well with this image!


Pack Your Bags Cricut Cartridge
     Image cut at 5"
Blossom Imagine Pattern Cartridge
PaperTrey Ink Kraft Cardstock
ColorBok White Cardstock (all colors printed on the Imagine)
Pink By Design "Aloha" Stamp Set
Stampin' Up Early Expresso Ink
Recollection Pearls
Turquoise Stickles

I didn't want to add anything else to this card, just wanted to make a super simple card with a summer theme. I don't think it looks too plain and I love the way it turned out!

Enjoy!

Sunday, July 10, 2011

Printable Vinyl and the Imagine!


I was able to pick up some printable vinyl the other day and couldn't wait to try it out! I didn't make anything too extravagant...just some simple little borders!

Monday, July 4, 2011

A monogrammed card set and notepad!

Some more of my new cartridges included the Teresa Collins Black & White Imagine Cartridge and the Cricut Sophisticated Cartridge. So I decided to try my hand at a set of Monogrammed 4x4 cards and a matching notepad!


Cricut Sophisticated Cartridge
     J Frame (page 48) Cut at 3 1/2" for the cards and 3 1/4" for the notepad.
     I hid the j with my Gypsy and cut out the J at 1 1/2" for the notepad and 1 3/4" for the cards.

Teresa Collins Black & White Imagine Cartridge
Stampin' Up "Pretty in Pink" and "Regal Rose" Cardstock
Misc Black non-textured Cardstock
Martha Stewart Punch

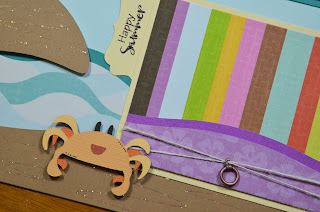
A Day at the Beach layout!

It's been a LONG time since I did a layout for my kiddos scrapbooks, but I have done a couple here recently and cannot wait to get some of their pages done! Now if only I could find where I left my time...

...anyways, here's one I finished this morning!


Cricut Cartridge "Pack Your Bags"
     Island (page 45) cut at 6 1/2"
     Sand Castle (page 30) cut at 5"
     Crab (page 25) cut at 2 1/2"
     FlipFlops (page 26) cut at 2 3/4"
     Sea Shells (page 29) cut at 2 3/4"
     Beach Ball (page 31) cut at 2 1/4"
     Turtles (page 38) cut at 2 1/2" and 3 3/4"
Pink By Design "Summer Vacation" stamp set
The Paper Studio "A Day at the Beach" paper stack
Misc Bazzill and other cardstock from my stash
Creative Memory and Purple Cow Trimmers
Blue Moon Beads
PaperTrey Ink Twine
Glossy Accents (on the sun paper)
Stickles (on the sand)

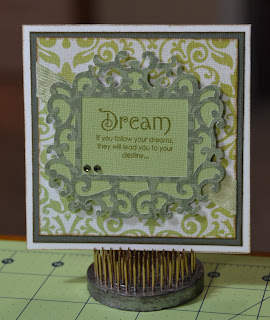
A little set of Inspirational Cards.

Emma over at My Creative Time just released some new stamps set, and when I saw them I just HAD to have them. My two favorite sets are "Inspiring Words" and "Inspiring Words (Accents)." I also had just received the new Vintage Damask Imagine Cartridge and Cricut Fancy Frames Cartridge and knew that they would all go perfect together...so what do you think?


These are just simple little 4x4 cards. I used the Fancy Frame 5 cut out at 3x2. I had to make the frame a little more square to fit on my card, so I used my Gypsy to do that. I inked around the edges with Tim Holtz Distress Ink and stamped the sentiments with Stampin' Up Old Olive. I added some Spring Moss Crinkle Ribbon and some Little Yellow Bicycle Jewel Stickers as the finishing touch.